Thursday, December 25, 2014

A Holiday Wish for You


Plus a 'Layered' Tatted Snowflake

I am FINALLY updating my blog, and I want show off a gift I just received from my very talented sister-in-law, who has taken up the 'new' craft of lettering on a 'chalkboard' canvas.    At Thanksgiving, I immediately noticed an attractive, artistic black-and-white 'sign' she had hung on a wall in her dining room. I thought she had purchased it!  I had no idea she was dabbling in this 'new' art form!  And I certainly didn't know she was planning to make one for me! 

It's actually a throwback to the time in the Nineteenth and early Twentieth centuries when fancy lettering and embellishment was the 'norm' on signs or in newspaper advertising as a way to draw customers' attention to a product or announcement.    Although I had been noticing more chalkboards in different shapes and sizes in the craft stores, and was aware that there are special chalk 'paints' to decorate them, I had no idea how popular this art form had become until I recently looked it up on the internet!  

For this sign, she painted a 12" x 12"  white canvas (pre-mounted over a 1" frame) with a special black 'chalkboard effect' paint, and did the beautiful lettering with a white paint pen.   I love it and very much appreciate the talent that went into creating it!  A very special keepsake gift, indeed!   

Layered snowflake
Of course, the canvas is meant to hang on a wall (and is very lightweight), but for the photo I laid it flat as a special background for showing one of my 'newer' snowflakes (tatted about a year ago!), which I 'built up' to a layered effect by adding several embellishments, including a center motif of a metal doodad with tatting around it.  The background snowflake (about 4" across) is done in size 20 pink Cebelia.   

I will explain more about this layered snowflake (which has its own brass ornament stand) and its evolution in my next post (which will be soon!). 

I wanted to get this post in today so that I could 'quickly' update my blog; and I especially wanted to wish you all
 
A very Merry Christmas and a pleasant Holiday Season! 


Wednesday, July 2, 2014

2014 Patriotic Pendant, plus Keepsake Paperweight


Both items have the same Small Motif pattern,  with doo-dad inserts.
 
Several months ago, I tatted two motifs based on Jane Eborall’s ‘Small Motif’ design, (see info below), but I substituted a doo-dad for Round One.  

 (These doo-dads - one silver and one gold - are plastic but are
nicely made and are smooth on both sides.) 

I then put the motifs aside after tatting them, and I finally found places to show them off!

Fancy Scarf!!
 
How is this for a dramatic presentation of a tatted pendant?

I will be wearing this scarf to my hometown's Parade on the Fourth!  It’s made of ‘yarn’ fibers with lots of sparkly silver beads, plus fringed ends!
 
When I saw the scarf at Hobby Lobby, I knew it was the perfect showcase for my new pendant on my silver slider.


Finding the Motif
Several months ago I was looking for a 'quick' motif to tat so that I could start using up some doo-dads that I have, and it seemed that Jane’s “Small Motif” pattern was a good match.   I loved the 'petal' shape, and it had six sides to match the holes in the doo-dad.
 
The thread is Lizbeth Christmas Red, size 20 .  Unfortunately the doo-dad seems no longer to be available at Hobby Lobby   L 

The doo-dad is substituted for the first round, but I had to figure out how to ‘encapsulate’ it (see figure below) and at the same time add six rings (mock rings in this case), ready for Jane’s second round


 As many of you know, you can find Jane’s fabulous patterns and her exceptional drawings at http://janeeborall.blogspot.com/  
  Then look on the left sidebar for her ‘patterns and techniques’ pages. 
 The ‘Small Motif’ is found under ‘Motifs, Snowflakes and Doilies.’

Encapsulating the doo-dad   
Substitute for first round)

This is generally what the tatting around the doo-dad looks like.

Using only a shuttle and ball (not much thread needed on the shuttle), I inserted the hook into a hole in the doo-dad, then rather than a normal ring, I thought it would be easier to add a 'mock ring', which I did with a 6 – 6 chain  (joining the first and last stitches of the chain).

Then I did a chain of 3 vsp 3 to get to the next hole, and inserted the hook into that hole, and did another ‘mock ring’, then continued around, joining the final chain at the base of the first ‘mock ring’. Then I ‘cut and tied’!   Turns out this was all quite easy to do!  The knot count on the chains can be adjusted according to your tension.  
Now I had the six 'rings' ready for the second round of Jane’s pattern !

The hooks on the Aerlit and Pop-A-Bobbin shuttles are just the right size for
getting through the hole in the doo-dad.
Of course, you can also use a very ‘fine’ crochet hook.

Second round
For the ‘flower petal’ round, two shuttles are required, and I simply followed Jane’s instructions, except I started by inserting the hook into the vsp between the mock rings and began with the long chain, rather than starting with a split ring.   (Jane’s pattern indicates climbing out from the first round; but of course, that wasn’t possible here.)

Second Motif - Keepsake Paperweight


The second motif, with a gold center, is designated as another keepsake for our ‘Winter Wedding’ anniversary. 

The motif, mounted on a white velvet paper disc, fits perfectly in this  paperweight without distortion, and is enhanced by gold accents. 

(I found the paperweight at a local craft outlet (Pat Catan’s  in Ohio and PA).  It’s made of very clear glass  with an indentation on the bottom that allows for the thickness of the thread and doo-dad.


Here is the motif removed from the paperweight, so you can see the detail of the embellishments which I added from my scrapbook stash, as follows:
 
Flat adhesive gold ‘studs’,
and gold foil ‘corners’ to give the white velvet disc some added texture. 
 
(The red circle is just the background for the photo.)


 Margaret will appreciate my use of the gold stickers (we both love to use gold stickers on our cards)!  As you know, Margaret not only does beautiful tatting and other needlework,  but she’s also a very talented card maker, and you can see her blog at  http://margaretsdesignercards.blogspot.com/   
She happens to be from England, and was born on the Fourth of July!!!
Happy Birthday, Margaret!  


It’s great that for the USA’s Independence Day, I’ll be wearing a motif designed by Jane Eborall,  a 'very English' gal! 
(I've learned that her sister, Sally, was also born on the 4th!)
Happily, the 'problems' of the 1700s
are long ago and far away!  Our ancestors would be astounded
at our modern conveniences, especially the internet,
which allows instant communications of ideas!
And wouldn't they marvel at airplane travel! 
 
I’m also part English, by the way!  My great-great grandfather
was married in a magnificent church in London in 1847.  (Interestingly, newspaper announcements of the time state two different churches, so we're not sure which one it was!)    His son, my great-grandfather, came to West Springfield, Massachusetts in the 1870s and had six daughters and one son (!), who  was my mother’s father!  Sadly, I never met my grandfather, who  died in 1929, many years before I was born.    .
 
I hope those of you in the USA have a
great Holiday weekend! 


Wednesday, May 14, 2014

Doily 'Under Glass'


A recent post by Karen Bovard  (http://www.theshuttlesmith.blogspot.com/ )  describes a very clever way to display and protect lace doilies when decorating for a luncheon or party.    She and her friend happened to be using clear plastic plates and realized that they could put  a lace doily on the bottom plate and then put the other clear plate on top, for serving goodies such as cookies. The doily is totally protected yet visible!   She showed a particularly pretty crocheted doily with colorful pansies around the edge.   

Her post reminded me that I hadn’t shown how I’ve been displaying my antique tatted doily for the past year or so!  Similar idea ! 

 
After being stored away and basically used as a backdrop for photographs on my blog, this sweet doily finally found its ‘home‘ on my coffee table, displayed under a glass dish on top of a gold charger,  topped by a tall hurricane lamp/candle.   
 
This doily (shown more clearly below) is about 8” across.
I felt fortunate to find it in a small local shop.   The owner was delighted that it went home with a tatter!

You can see the ‘layering’ for the display:   Gold charger (explained below), black velvet circle, tatted doily, clear glass dish, real candle (with a cut-out area on top for a battery-powered tea candle), and glass hurricane ‘cover’.     


Another view, without the hurricane glass. 

‘Chargers’ have apparently been around for a long time (large plates used under formal place settings for decoration) but they became very popular in the late 1990s.  That's when I first noticed them in stores).
 
There are lots of ideas for using them if you search for ‘chargers under place settings' and click ‘Images’.  They even use this same idea of a clear glass dish to put photos under them!    Long ago in a galaxy far away, I used to have guests for ‘formal’ dinners in the dining room (6 people, is max for me!).  I always enjoyed decorating the table more than preparing the food (still do!)  and would have used the chargers if I had them.  I only bought a few in the ‘90s for decorations around the house during holidays.


The lovely lace edging, similar to designs I've seen in older magazines, fits perfectly around the linen center.   I can only guess that the tatting was done first, then the fabric was cut out and the raw edges over-stitched by hand with some fancy filler stitches.  And it looks like there’s a teeny, tiny crocheted chain catching the tatted stitches.  Fabric centers are very practical for many reasons, but they demand a skill level that would be difficult for me to accomplish, so I admire those who have that talent!    


Of course, the clear dish protects the doily from the candle.  Even though the candle is wax and has a wick, I scooped out the center (several years ago) and put a battery-powered tea candle in there.  Much safer and easier to deal with - no wax drips, no oily smoke!    

When battery-powered tea candles first came on the market, I marveled at what an ingenious product they were - and are! .  Fortunately they came down in price, and I have many around my home and don’t have to worry about candle  flames.  These days some large ‘faux’ candles come with  battery already flames built in.  (The only disadvantage I see is that very young  children who ‘grow up’ with the battery candles in their homes may not distinguish them from a real flame on a real candle! )     

This candle display usually is the centerpiece of my coffee table, but now sits to the right of my anniversary display.  However, it fits right in, especially since the charger is gold!   


Friday, May 2, 2014

Special Anniversary 'Tatting' Display

... and a New 'Anniversary' Necklace


This is a new necklace (with a ‘repurposed’ tatted heart) that I recently put together as a personal Anniversary memento.   It’s about 2” in diameter.  I was pleased with the way this turned out! 

The heart was tatted in a gold cotton thread (size 12 DMC Pearl cotton) and was designed by Kim Goetz, in Victorian Hearts & Flowers magazine (Better Homes and Gardens – 1995). 


I tatted the motif many years ago and encased it in a paperweight.  But I decided to remove it from the paperweight and use it on a necklace as an anniversary memento.   I’ve already received several compliments on this necklace from salespeople who have waited on me in stores!    

 
Coffee Table Display
I always use my coffee table to display cards and holiday items throughout the year, and, of course, I take them down after the event.  However, this year I’m keeping my Anniversary display up for a while, especially since we get more visitors during the summer months!  It’s also a way to display my special tatted items here at home!     


The lovely plant is a gift  from our brother- and sister-in-law,
mentioned in the previous post

On the coffee table, along with the bell ‘tower’, are three favorite ‘heart’ items.   

First: Teri Dusenbury’s ‘Regal Heart’ (on the velvet heart box), which I’ve had for several years.  I believe it’s the only heart in Teri’s ‘Tatting Hearts’ book which does not have split rings!  That’s why I tatted it, because when I bought her groundbreaking book in the mid-‘90s, I had no idea how to do split rings!  I sewed the pearls on afterwards and attached the lace to the box with beaded pins.  Therefore the lace can easily be removed and washed if necessary.   

Second: Lyn Morton’s ‘Hearts and Flowers’ pattern, from her book “Tatting Patterns”.  The pattern was free on her website for a while, in 2010. The motif is displayed here between two pieces of clear glass - originally ‘large candle’ holders (different sizes) that happened to ‘nest’ together perfectly, encasing the tatting.

I was amazed to discover just now that Lyn Morton and her husband have recently retired, and there are new owners for their e-shop, ‘Tatting and Design’ (England).  The website is an excellent source for tatting items and books! http://www.tatting.co.uk/  

Third:  On the white candle is Frivole’s sweet ‘Happy Heart’, which she generously shares with us on her excellent Patterns page (see the tab at top of her blog) at http://leblogdefrivole.blogspot.co.uk/
 
 
Fashion statement from 1964

I am always pleased when I look at our 1964 wedding photos, as they don’t seem too ‘dated’ to me, except for my and my two attendants' hairstyles.  I had a medium-length 'flip', my Maid of Honor had a straight, slightly bouffant style, and my bridesmaid had her hair in a loose french twist, light teasing on top.  

The hairstyles of the ‘70s  featured mostly long and straight hair on the gals, who also sometimes wore floppy hats;  and the guys wore wide-lapel pastel tuxes, perhaps in bell-bottom style!  Also boys and men in the '70s were wearing their hair longer, and in some cases very long! 

Our best man and usher had short hair and wore classic black tuxes, which would look just fine today!
 
What is amazing to me is that we all were only 19 or 20 years old!
I loved the ‘Christmas red’ taffeta gowns my two attendants wore, although today I would choose burgundy velvet gowns (similar to the color of the bow and velvet box in the photo above).   

 
 The girls each carried a white fur muff and wore a small, white fur pillbox hat, with a small, silk red rose attached in front.  The muffs had a 'crescent' of fresh red carnations attached. 
 
I still love the style of my white satin gown, with a full skirt and short train.  My mid-waist-length veil was capped by a scalloped pillbox hat made of white sequins, which sparkled in the light.
Our gowns had bateau necklines and long tapering sleeves.  Strapless gowns were not allowed in churches back then! Our sleeves were form-fitting and didn't have the puffy look of the ‘90s, which does tend to ‘date’ those wedding gowns now – but I liked the Victorian / Renaissance look of some of those gowns.     


Saturday, April 26, 2014

Something Old, Something New


Golden Anniversary
 
Although the phrase “Something Old, Something New” is usually associated with weddings, it also describes my new Anniversary Keepsake that I recently put together after celebrating our milestone wedding anniversary this past January.    I have created keepsake bells for others but not as elaborate as this one!    I used various old and new items to assemble it.    I’m very pleased with the way this turned out


The finished display is about 12” high. 

I’ve had the brass stand for a few years, and knew it would be perfect for attaching the various items, using wire or ribbon.

The ‘new items’ are

-  Numerals ’50’, which were included in a beautiful plant we 
   received from our brother- and sister-in-law

- Two Metallic gold bells (2.5" high) that I purchased at a
   card store.   The 'flares' of the bells almost look like
   tatted rings!
  
- ‘Bow’ Pin (1.5" high) (explained in third photo below) 


The old’ item is, of course, the tatted bell, which I made in 1992, during the early years of my tatting (1990-94) when I was ‘on a roll’ with creating 3-D items,    

It was initially a ‘Christmas’ bell to hang on the tree, but it wasn’t long before I adopted it as my Anniversary bell, since the colors of my wedding were red and white.    It’s made with size 20 Cebelia

There is a gold filet ‘clapper’ inside the bell(not visible in this photo)


This is a close-up of my new sparkly bow pin (not attached to the
bell but only to the brass stand), which I wore to our anniversary dinner.   I can remove the pin from the stand  if I wish to wear it again.

I even sewed small gold bells onto the pin, which are from  “La Mode’ (buttons).  I thought they made a nice addition to it.
 

The gold filigree ‘clapper’ hangs on a chain inside the tatted bell and can be seen peeking through on this photograph


Celebration(s)
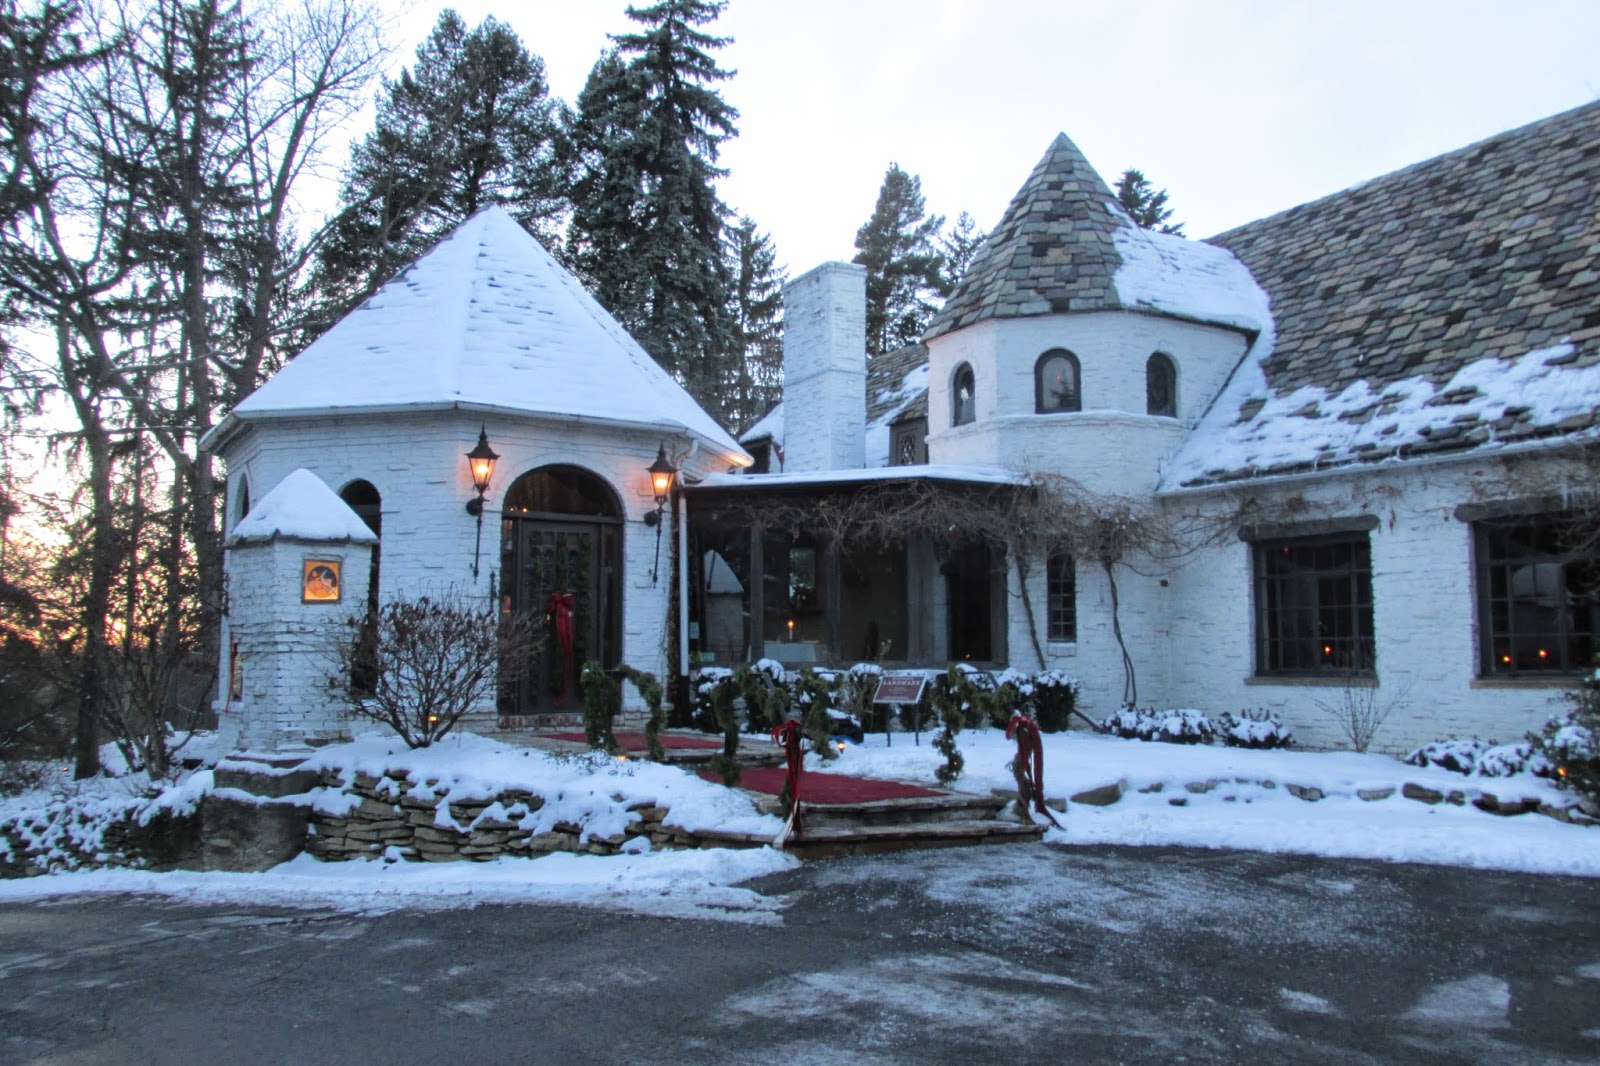
Below is the very elegant  restaurant we were taken to as a wonderful surprise by our brother- and sister-in-law  on our Special Day.   This restaurant  has quite a history, and it’s just as elegant inside!   As we had never been there before, it was a really special evening! 


And the weather also cooperated!   In fact, it was similar to the weather on our wedding day in 1964 - a little overcast, and temps in the mid-40s, with some snow leftover from a few days before.  Our anniversaries have ranged from a balmy 60 F. down to 10 F.  On our 30th in 1994, we had to dig out 10” of snow so that DH could get to work !  As I was shoveling snow that day, I was just grateful that we didn’t have that kind of snowstorm on our wedding day!  

This past November we had a low-key, informal celebration of our anniversary (exactly what we wanted) during the Thanksgiving weekend (hosted by the same brother- and sister-in-law), which was a planned get-together with family and several cousins whom we hadn’t seen for several years.   Our other sister-in-law (the one for whom I made the 25th anniversary ‘Mary Konior’ bell) surprised us with a beautiful 50th Anniversary sheet cake for dessert. 

I’m very grateful that we have achieved this magic number, but I’m somewhat stunned at the ‘reality’ of it.  As everyone discovers as they get older, Time somehow speeds up!    It was only  ‘yesterday’ that we celebrated our 25th in 1989the year I learned to tat and quilt, and made the Victorian fan tree skirt, with my first tatted pieces on it (hens and chicks, of course, plus a straight line of rings!.  I was very proud of those!      (That year, we were also movie extras (ballroom dancers) in a made-for-TV movie, which is a whole other story!)  

Then we buzzed past the 30th, 35th, 40th and 45th anniversaries, during which years I demonstrated tatting at many events (at least four a year).  (I started this blog between the 44th and 45th !)   And all of a sudden, our 50th was ‘around the corner’!     Lots of memories, mingled with all kinds of emotions!

The other reality is that it's been 40 years since we built our house, and somehow it has become all filled up with 'stuff', which we're now trying to deal with.  More memories and emotions!

 *  *  *  *  *
                                                
Computer Update
I guess I could consider my recently purchased laptop as an Anniversary Gift, of sorts!   It’s very powerful and has a big 15.6” screen.  And – it’s RED – my favorite color, which is the main reason I chose it among the gazillion  models at the store!   Plus the price was right!   I’m now learning about Windows 8 and finally have the full Office again, including Publisher.  I’m hoping I can start blogging more often now! 
This is my first post using it!