- New (to me) butterfly pattern
- Necklaces for pendants
I’m finally doing a post again, and never intended to be away this long! I’m ‘late’ in finishing my second round of the 25-Motif, so I’m getting back in the game with Motif #19 today to show that I actually am doing some tatting, and I hope to finish posting six more motifs soon, to complete the 25.
Motif #19 – Second Round
from “Butterfly Twins” designed by Eliz Davis.
We’ve been traveling and having some fun adventures (except for a flat tire on the turnpike - long story there!) and while on the road or at a motel, I like to tat 'easy' things. I happened upon this sweet butterfly pattern on the internet, and I was smitten! I knew it would also be a fun and quick way to ‘test’ the colorways of variegated threads

Clockwise from Upper Right:
Caron Wildflowers ‘Twilight’ ;
Lizbeth #20 Vineyard Harvest;
Lizbeth #20 Vineyard Harvest;
Lizbeth #20 Spring Garden
Caron Wildflowers ‘Twilight’ ;
Lizbeth #20 Vineyard Harvest;
Lizbeth #20 Vineyard Harvest;
Lizbeth #20 Spring Garden
Center of Photo:
Caron Wildflowers ‘Harvest’
Caron Wildflowers ‘Harvest’
This three-ring section is the first round of the butterfly pattern, but I made a slight modification (see below).
The original design, “Butterfly Twins” by Eliz Davis (“Tat Knot”) goes back to 1998, is a diagram, and is located in the sidebar in her blog http://www.tatknot.blogspot.com/ where she has generously shared other free patterns. Thanks, Eliz!
As the title implies, the pattern is written for two little butterflies to be joined together, and attention must be paid to the outer chains (the wings) on the diagram for placement of the picots and connections when forming the wings. However, because I made individual butterflies, I used the same stitch count for forming both wings, with no picots.
Also, in order to do each butterfly in one pass, Liz indicates a split ring for the third ring of the 'clover' in the first round, which would be very convenient for avoiding extra threads to hide.
However, I didn’t want to wrap two shuttles to do the split ring, so I did a normal ring instead (5 total picots: two joining and three showing - always being careful not to twist the final joining picot to the first ring). For the most part, hiding threads is not a big problem for me, and I usually encapsulate the beginning thread. Also, I could choose the color for the beginning small ring on the second round. (I didn't do front-side/back-side tatting on these!)
The antennae are quite easy to add (with a crochet hook), but as you can see, I have so far only added antennae to the ‘blue’ butterflies.
The antennae are quite easy to add (with a crochet hook), but as you can see, I have so far only added antennae to the ‘blue’ butterflies.
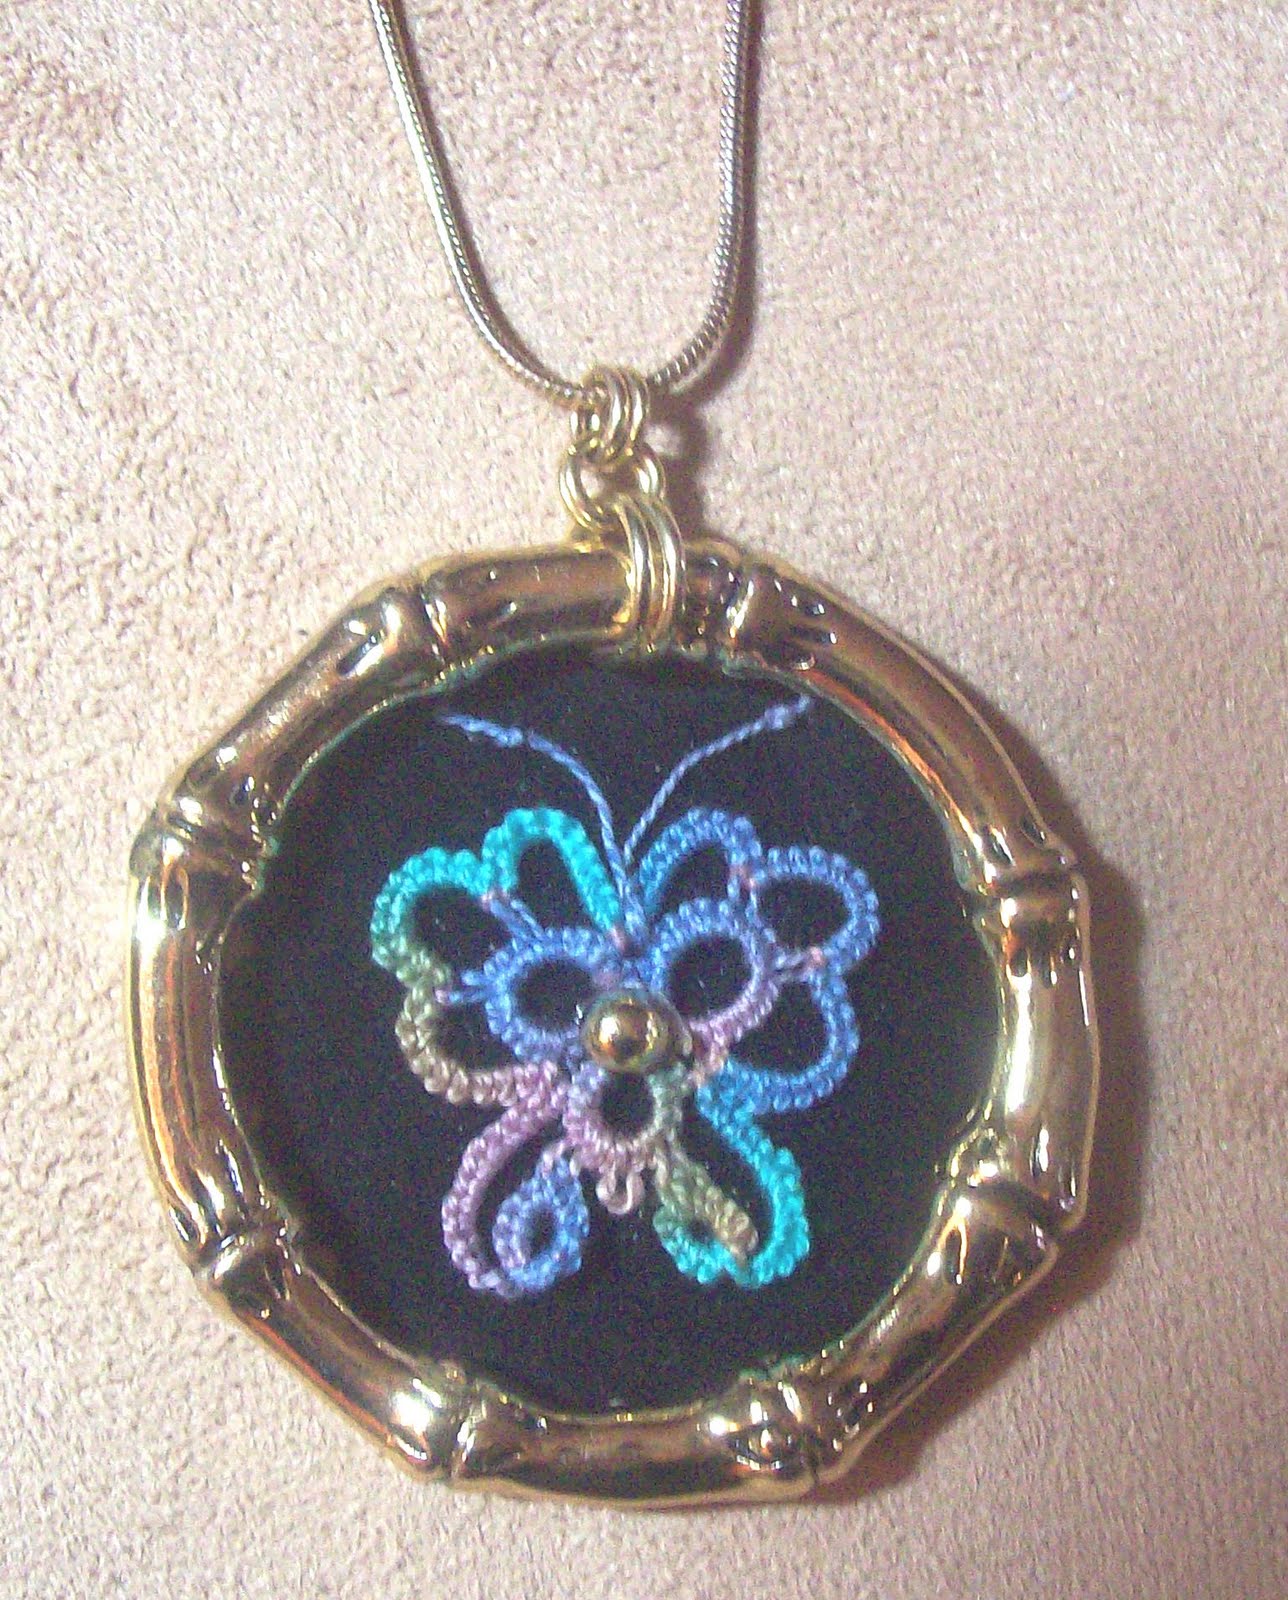
Of course, I had to put one of these butterflies on a pendant!
This is a duplicate of the
‘Twilight’ butterfly shown above, although the colors aren’t quite exact in either photo.
This is a duplicate of the
‘Twilight’ butterfly shown above, although the colors aren’t quite exact in either photo.
I obtained the Caron Wildflowers threads at my local cross-stitch shop. They are equivalent to size 30, but are a little tricky to tat with – not as smooth as Lizbeth. I have to use less tension.
The little butterfly is also perfect to add to cards, such as the one I made for my mother-in-law for her recent birthday.


These were made with Lizbeth ‘Jellybean’, and were easily attached to the card with gold brads (from my scrap book supplies)
“New” beaded necklaces for my pendants
My recent posts have shown small motifs I’ve put on scalloped black velvet ‘paper’ discs. I recently attached four of them to some colorful beaded ‘necklaces’ that I found at – of all places - the dollar store!
They were eyeglass leashes! I cut off the parts that go over the eyeglass ‘temples’ and joined the ends with a jump ring and bail (which necessitates putting the necklaces on over my head, without a clasp).

I was amazed at the variety and colors of beads on the leashes, which happened to match my pendants!
I did add my own green beads and spacers to the necklace on the far right.
My next posts should be coming up soon! I’m getting much more done around the house with the cooler Fall weather, and always marvel at the changing colors of the leaves – which sometimes happens overnight! It really is a beautiful time of the year, and I'm not missing the hot, humid weather we had this summer!
A blogging note: I edited portions of this post (the next day) to 'improve' some of my sentences (that task could go on forever!), and I also tried very hard to make the spacing the way I want it to be. The written edits indeed were reflected, but I just can't seem to control the spacing. And it may get even worse! I know it has something to do with 'html' codes, but I have no intention of learning them. So, unfortunately, my posts will continue to look a bit 'wonky' and not up to my standards! I'm amazed that blogging can be done at all and I find the technology wonderful - but also frustrating!


I LOVE your pendants. SO pretty. Good to see you back too.
ReplyDeleteYour butterflies all look great and the necklaces are awesome! :)
ReplyDeleteThanks for all your comments on my blog they are always so encouraging. Traveling, sounds very exciting especially the adventures. I also love the pendant necklaces you have made, the beads certainly liven them up.
ReplyDeleteSuch pretties!
ReplyDeleteFox : )
You are very welcome! I'm so glad you've enjoyed the pattern. I really love what you've done with the eyeglass leashes.
ReplyDeleteYou turned the tattingpieces into lovely jewelry. Not just the tatting, but the all the other beads: just great!
ReplyDeleteVery pretty the way you mounted them up and added all the blings!
ReplyDeleteLovely butterflies and thank you for the longest comment on my blog. It was really great and quite informative.
ReplyDeleteYou have created some very pretty necklaces!
ReplyDeleteSo good to see you posting :-) What a great idea with the eyeglass leashes! I love your use of color in your necklaces.
ReplyDeleteThe spacing on blogger drives me crazy too. I end up editing the thing over and over again. I really don't understand why it can't look exactly as its going to look while you are actually writing it, but it doesn't. Wish I had some better advice!
Enjoy the remainder of the fall season!